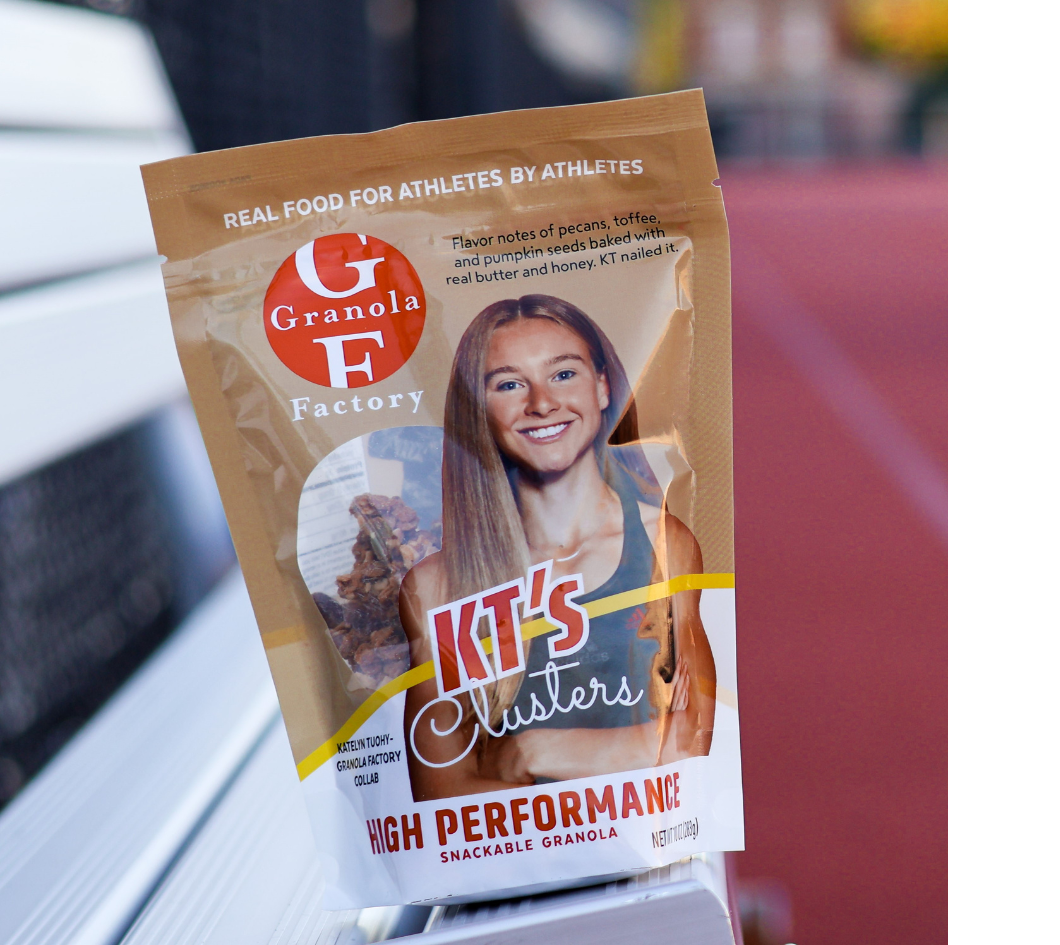
With the Olympic Trials complete, it’s time to release KT's Clusters and discuss what lead to this collaboration. Katelyn Tuohy is a
name that has become synonymous with running, but one I wasn’t aware of until
she contacted me on Instagram in 2022. The NIL had just begun in the NCAA and
Katelyn was looking to partner with brands she liked. After reviewing Katelyn’s
background and realizing how accomplished she was as a runner, I was flattered
she would have an interest in partnering with a small bakery like Granola
Factory.
With the Olympic Trials complete, it’s time to release KT's Clusters and discuss what lead to this collaboration. Katelyn Tuohy is a
name that has become synonymous with running, but one I wasn’t aware of until
she contacted me on Instagram in 2022. The NIL had just begun in the NCAA and
Katelyn was looking to partner with brands she liked. After reviewing Katelyn’s
background and realizing how accomplished she was as a runner, I was flattered
she would have an interest in partnering with a small bakery like Granola
Factory.While we didn’t partner in 2022 due to our unfamiliarity of
the NIL, I contacted Katelyn again this past winter after she turned pro. I
wanted to pitch her on an idea that was more than just repping our brand on
social media. I knew she had an interest in food, so I proposed teaming up on a
granola product that would not only have her name and image on the package, but
her heart and soul in the recipe. Katelyn loved the idea, and a few weeks later
she flew to Bethlehem and spent two days with me in the kitchen testing recipes
until we landed on the perfect batch.
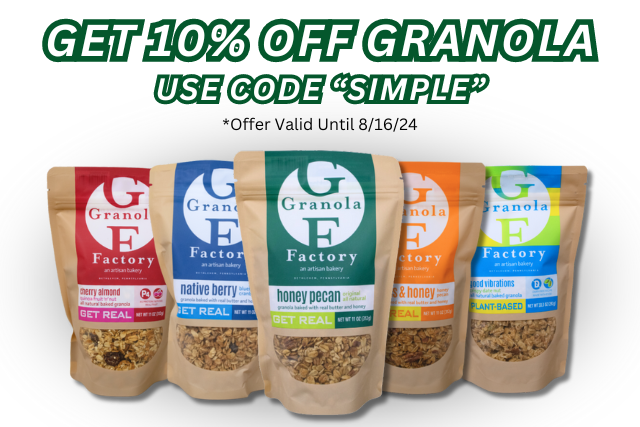
Every morning, I start my day with a run followed by granola
and yogurt. Katelyn starts most mornings the same way, so we both understood that
fueling our bodies with the right food leads to optimal performance. In KT's Clusters, we baked with real ingredients such as rolled oats, butter, honey and
pecans. The result was a granola that provides energy without sacrificing
quality and flavor.
With the trials behind her, there’s more to granola in
Katelyn’s sights now that she’s back to training at a high level. I sat down
with Katelyn to discuss all things running, food and fun before her granola
release.
Q&A with Katelyn Tuohy
Katelyn, if I told you a year ago that you’d be releasing
a granola cereal that has your name, image, and baking ability in every bag,
what would you say?
I wouldn’t believe you if you told me a year ago that I’d
have my own granola, which is something so unique and so cool. As a kid you see
famous athletes on a Wheaties box. And these are such well-known athletes and they
have such an impact on so many people’s lives. To have something in common with
them is super cool. And it’s definitely unique that I got to make the granola
myself. Getting to pick the ingredients is super cool and something that others
haven’t had a chance to do before. So instead of being just a face on a well-known
product, we actually got to make our own product the way I wanted that included
the ingredients I like.
-
KT's clusters has a great mix of ingredients, including
pure honey, roasted pecans, toffee bits and pumpkin seeds. What inspired this
unique mix of flavor and texture, and why did you opt for a clusters?
The inspiration came from my two favorite flavors: the Honey Pecan Original Blend and the Toffee Almond. The Toffee Almond was probably my
favorite before KT's Clusters. I really like the flavor and the fact that it was
clustered together so you could eat it as a snack or put it in your granola or
yogurt bowl. It had a lot of versatility which I liked. It made it easy for a
snack or to put it in a meal, so I think that’s what inspired it.
-
I think every runner has a moment when he or she realizes
that food is vital to optimal performance and recovery. Can you recall this
time in your career and how did it start to shape your dietary habits?
My freshman year of high school in the indoor track season I
was going for my first title in the 1500 and I lost. That outdoor season I was
determined to win my first state title. So what I did was try to focus on the
little things, one of them being nutrition.
At the time, I thought I was making healthy decisions and healthy
habits, and I was, but obviously not to the extent I do today. I tried to focus
on eating nutritious meals and fueling my performance allowed me to make a huge
jump. I ended up winning the state title that year. I attribute a lot of that
success to nutrition.
-
What are some of those nutritional changes you made
throughout the years? How do you think they helped you feel better either when
you’re running or when you’re recovering.
It was definitely a learning curve, but one of the main
things I’ve learned is that timing is big and something I’m still learning and
playing around with. But coming into a training session under fueled or
dehydrated can make workouts so much harder and affect your recovery. So that’s
something I definitely have been working on and I think has helped me a lot
because training is meant to damage your body. Repairing it is what makes you
better. That requires a lot of energy, so if you’re not adequately fueled you
won’t be able to adapt to the hard work and training you’re doing.
-
What role does granola play in your meal planning? Do you
prefer it for breakfast, lunch or a snack?
I think granola is one of my main fuel sources just because
of its versatility. I can eat it out of the bag even 20-30 minutes before a
workout because it doesn’t hurt my stomach, and it fuels me well and I’ve been
using it for years. I love throwing it
in my yogurt bowls to get some carbohydrates in with my protein, and I’ll add
fruit to make a meal. Sometimes at the need of the night if I want I little
snack I’ll grab a handful just because I love the taste.
-
Do you like to cook and bake, and if so, do you have any
go-to recipes or recipe creators?
I’ve gotten into cooking now that I’m a professional and have
more time on my hands. I was definitely spoiled growing up because my mom
cooked all our meals I don’t think we ever had a night where we didn’t have a
family dinner. It was something I grew up with, having home cooked meals, so
it’s an important aspect in cooking for my performance.
A lot runners have cookbooks. We talked about Shalane [Flanagan&91;'s cookbook, Run Fast, Eat Slow, so I’ll get some inspiration
from her.
-
What’s something that you’ve cooked recently that you
thought was really good?
I love making bowls, like some sort ground meat, rice and
some sort of sauce that’ we’ll whip up from scratch. We’ll throw some salsa in
there, like a peach mango, or some guacamole to get a good mix of proteins,
carbs and fat.
-
Describe a recent workout day. What was the workout and
what did you eat in preparation and in recovery?
 Good question! I guess we can talk about today being a
double workout. So double threshold, which means I have a morning threshold
session, take a gap in between and rest during the day, and then come back in
the afternoon for a second session, and then potentially a little lift and core
after.
Good question! I guess we can talk about today being a
double workout. So double threshold, which means I have a morning threshold
session, take a gap in between and rest during the day, and then come back in
the afternoon for a second session, and then potentially a little lift and core
after.
Before my first session, I’ll have something pretty light
just so my stomach isn’t upset since we have to go pretty early this time of
year and I don’t have a ton of time to digest in the morning. I’ll grab a bar
or granola and a little yogurt. I’ll come back and have a bigger meal with a
lot of protein and carbs to fuel the second session. And then after the second
session I’m definitely getting in more protein and carbs. I stay hydrated throughout
the day, not just with water but electrolytes.
I try to eat specific foods during specific time windows to
maximize performance and recovery. A lot of people think that fueling is just
for the session, but it also aides in recovery. It’s super important to fuel
after your session to repair your muscles and making sure you’re getting
prepared for the next day.
-
Do you aim for any specific dietary guidelines while
training? High Protein?
When it comes to protein, I’m trying to get as much in as I
can. And it helps to have supplements like protein powder and bars to get a
good amount of protein in without whipping up a big meal. You want to get
protein in within 30-60 minutes after working out. When I was in college it was
hard to fuel after workouts because you’re rushing to class, but now that I
have time it’s a lot easier and has definitely made an impact on recovery.
Pre-workout I’m trying to get in carbs and protein and
minimize the fat which I’ve found can upset my stomach. It’s a learning curve
and you have to figure out what works for you.
-
I know about your accomplishments as a runner, but what
originally drew you to the sport? When did you realize you had a natural talent
and passion it?
We were very athletic growing up, and we were often coined
the fast kids where we’d win the school mile. We’ve kind of always been “praised”
for being athletic and fast growing up. Once my older brother started running,
I was playing soccer and decided to join the indoor track team to work on my
fitness for soccer. It only took a couple of weeks to fall in love with the
sport. I quit soccer in 7th grade, which was a huge shock to
everyone because I was obsessed with it. And the rest is history because I’ve
been running ever since.
-
As you look back what were the greatest challenges you
faced in the sport and how did you overcome them?
I think being so young and having a lot of attention was
really hard on me. I grew up as social media and running platforms were becoming
a huge thing. I had a lot of pressure and attention on me at a young age.
Everyone in the sport experiences setbacks at times, and mine were injuries
throughout my career. I’ve had a couple injuries that set me back for a while,
and a lot of people will speculate and put pressure and criticize you, which
has always been the hardest thing for me. But being able to have my circle of people I
love and trust, like my family, friends, teammates and coaches has allowed me
to get through those hard times and come back stronger.
-
You’ve performed at a high level since the 7th
grade, which is a long time in this sport to be at the top of your game. Was
there ever a time that you didn’t like running and considered giving it up? I
think this is a feeling that many runners face at some point. How did you
persevere through these feelings to become the person and athlete you are
today.
There was definitely a period in high school that the
pressure became so much for me that I almost started being unhappy when it came
time to race. I almost didn’t want to do these big meets and I felt like every
time I stepped on the track I had to win or set a record or run the fastest
time of the year. I was pretty stressed and unhappy for a short period, and my parents
recognized that and encouraged me to take a step back. It took a little bit of
time, but then I realized why I fell in love with the sport to begin with, which
was primarily the people and my teammates, and the enjoying for training and
process. Realizing that allowed me to overcome those feelings. I took a step
back and focused more on having fun with my teammates. And my senior year of
high school ended up being the most fun I had with the sport. Even though my
performance maybe wasn’t the best, just being able to enjoy the season with my
teammates and making memories made me fall in love with the sport again.
-
What advice would you have for younger runners entering
the sport at the high school or collegiate level?
I think leaning on people in my circle, so I kind of just let
go of what people on the outside thought. I stopped reading articles that were
written about me or comments on my Instagram that people would make. I just focused
on being present and in the moment, and enjoying training with my friends. My
brothers run so I get to train with them, which is super fun. I try not to put
too much pressure on myself because at the end of the day I perform at my best
when I’m my happiest.
-
What do you think will lead to younger runners to
enjoying the sport for a very long time?
Letting go of comparison. I always enjoyed running because I
liked pushing myself and having that internal motivation. One of my favorite
quotes is “Comparison is the thief of joy.” So not focusing on what other
people are doing and just focusing on success and progress in my own training
definitely makes it more enjoyable. And then just getting to share the hard
workouts, the races, the highs and lows with my teammates and friends and
people I love who are involved with the sport has made running more enjoyable
outside of competition.
-
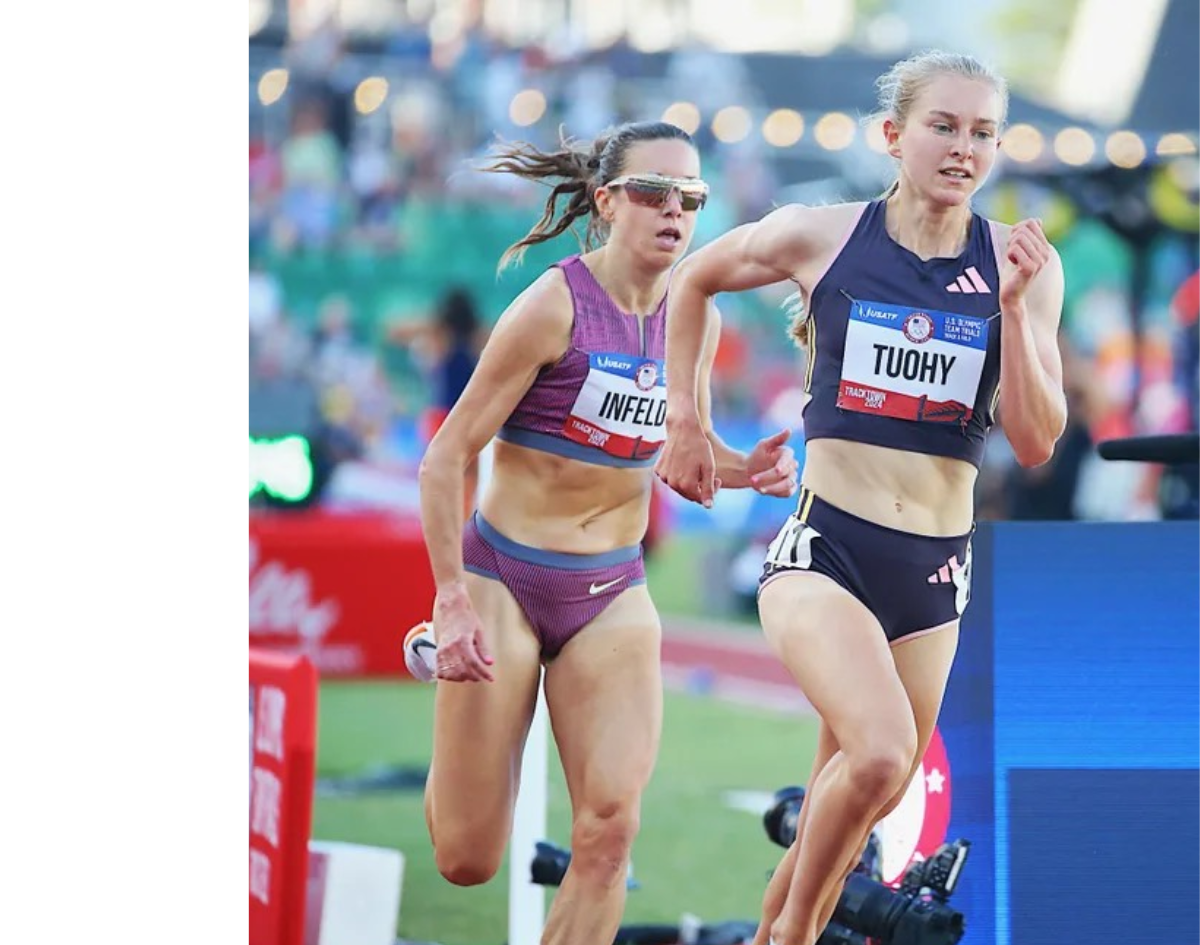
You just ran the 5K at your first Olympic Trials. What
are your takeaways?
The Olympic trials was my first professional race, which is
not an ideal way to start competing at the biggest meet of the year, but after
months of setbacks and injuries it just felt good to be back on the track and
representing Adidas and my friends and family, and get back to doing what I
love. Just being happy and healthy was an amazing feeling. It left me hungry
for more just because I got a taste of what it’s like competing again. I need a
few more training blocks under my belt before I’m back being in the shape I
want to be in. It was just nice getting in there and competing with the best
women in the country.
-
Most runners can recall their best races as if they just
happened yesterday. What do you consider the best race of your career? What
memories do you have during this race and what do you think lead to it being
your best performance?
 I think each cross-country national has been some of my best
performances. I had the motivation to do it for my teammates. I remember my
first xc nationals, I completely red-lined. It was in March of 2021, and it got
pushed back because of Covid. I was just a freshman, and I got thrown into the
biggest race of the year. I was running all out for my teammates, doing
everything I could, and it was probably one of the hardest I’ve pushed myself.
Each cross nationals after that was the same way, fighting for my teammates and
not even thinking about myself. Just trying to get every second and every place
for them. Those are definitely the races I look back and are most proud of
because I know they were doing the same for me.
I think each cross-country national has been some of my best
performances. I had the motivation to do it for my teammates. I remember my
first xc nationals, I completely red-lined. It was in March of 2021, and it got
pushed back because of Covid. I was just a freshman, and I got thrown into the
biggest race of the year. I was running all out for my teammates, doing
everything I could, and it was probably one of the hardest I’ve pushed myself.
Each cross nationals after that was the same way, fighting for my teammates and
not even thinking about myself. Just trying to get every second and every place
for them. Those are definitely the races I look back and are most proud of
because I know they were doing the same for me.
I think one of my favorite track memories was the Millrose
games last year, it was one of my first times back at the Armory since high
school. I got a nice warm welcome from the fans, so that was really cool
because I was lining up against Olympians, American record holders and some of
the best in the country. All the officials from when I was in high school were
there and it was good to see them. It was great to be home and go back to where
my whole running career started.
-
What do you have planned for summer training and racing?
Any PRs you hope to accomplish by the end of this year?
I plan on doing a race in Los Angeles at the end of July and then
doing my first European circuit so I’ll head to Europe and race three to four times
out there depending on the schedule. I’m just excited to compete as a
professional. Personal bests are great, but this year I really want to focus on
just racing and hopefully the times will come with that.
-
What’s new in your life outside running and granola? How
do you spend your free time?
Just living the “Pro Life.” Eat sleep, train, repeat, and I
love it. It’s been great now that the summer is here. My younger brother
doesn’t have school anymore, and my older brother Patrick came to Raleigh and
he came to Eugene. We’ve been training a lot together. They’re my two favorite
people to run with, obviously because they’re my siblings and I love them. There’s
almost no embarrassment with them. If one of us gets dropped, it is what it is,
and if one of us has a good day it’s great, too. We’re encouraging each other
and we just want the best for each other. It’s fun that we all have the shared
joy for the sport. My parents love it, too, because they just think it’s super
cool. We’re getting them into the sport more. We love watching track and talking
track. It’s just a family bond, I guess. -

]]>